With the help of layout master plumber / chief carpenter Mark Andersen, fascia installation has begun. Mark has built one each of almost everything in his career so is an excellent source for suggesting material and techniques.
We had used Masonite (C) on the previous layout but wanted something more flexible. Mark suggested using 1/4" bending poplar which is sometimes used to wrap around exposed pipes to create a more finished appearance.
Here, Mark is constructing installation points out of 1 x 2 ' s.
Here's a shot of the first installed section. The poplar is plenty flexible.
Introduction
The purpose of this site is to share progress on the N Scale Model Railroad Layout that is being built in my basement with the help of some great friends and model railroaders. Comments on techniques we're using are welcome as are questions and critiques.
Monday, December 20, 2010
Thursday, December 16, 2010
Progress at Gallitzen
We are continuing to make good progress, including quite a bit of recent work at the "top of the hill".
Here Bernie and JB wrestle the turnback section into final position. The section was built at the workbench, allowing wiring and switch machines to be installed without working underneath the layout.
The hole that JB is "testing" allows emergency access to a turnout at the back of the section.
We have also been working on scenery in this location, including finally getting track painted in preparation for ballast, backdrop painting, planting trees, and preparing for the first layer of scenic material representing the open fields just north of the railroad at the east portals.
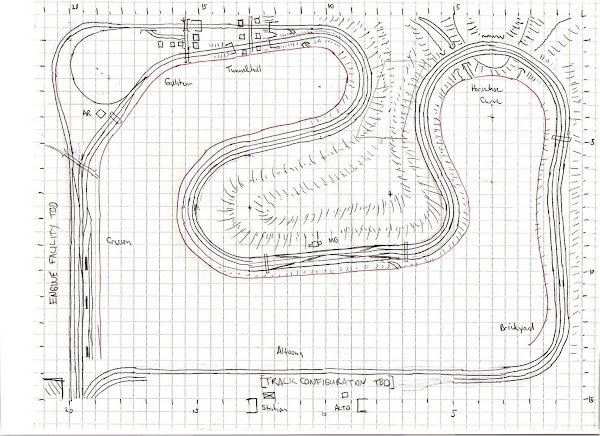
Here is an aerial view of progress to date.
Monday, December 13, 2010
Rock Carving Session
Wednesday, December 1, 2010
Work Session 1 Dec 2010
JB Weilupp and Bernie Kempinski attended JD's work session on 1 Dec. JB did track work and tree planting while Bernie painted backdrops. Here are some photos.
Behind Gallitizin Tunnel |
Downhill from Gallitizin Tunnel |
JB Working on something |
Behind Gallitizin |
Horseshoe Curve |
View over top of MG Tower area |
Horseshoe Curve |
JB and JD admiring new backdrop at Gallitizin |
Horseshoe Curve |
Tuesday, August 31, 2010
Making Mountains
The PRR called the area around Horseshoe Curve "the mountain" and the layout includes lots of wooded hillside, much of it above track level.
We came up with a different way to build "the mountain".
First step is to construct a plywood frame to rough in the overall contours.
Next, the plywood is filled in using a web of cardboard strips and covered with heavy paper.
The paper is painted black and in some cases, reinforced by plaster sheets.
Here, a couple of trains have snuck on scene right at the curve.
Finally, the black-painted paper is covered in Woodland Scenics foliage clusters. Lots and lots of foliage clusters.
We used to attach the clusters with hot glue but now use clear plumbing caulk. The caulk doesn't leave strings of glue on the scenery or burn marks on the crew. It is tacky enough to hold the clusters, even on our steep slopes. The caulk is spread on the paper about a square foot (one scale "acre") at a time. The clusters are pre-shredded (a great job to do while watching baseball) and the caulk remains tacky long enough to fill in the acre before it sets up.
Here's Mark planting away above MG tower.
One of the advantages of the plywood / cardboard / paper structure is that it is very easy to make changes. We already have done so in two spots on the layout. Each time it only took an hour or so.
Here's a bit of almost-finished scenery just below the curve.
We came up with a different way to build "the mountain".
First step is to construct a plywood frame to rough in the overall contours.
Next, the plywood is filled in using a web of cardboard strips and covered with heavy paper.
The paper is painted black and in some cases, reinforced by plaster sheets.
Here, a couple of trains have snuck on scene right at the curve.
Finally, the black-painted paper is covered in Woodland Scenics foliage clusters. Lots and lots of foliage clusters.
We used to attach the clusters with hot glue but now use clear plumbing caulk. The caulk doesn't leave strings of glue on the scenery or burn marks on the crew. It is tacky enough to hold the clusters, even on our steep slopes. The caulk is spread on the paper about a square foot (one scale "acre") at a time. The clusters are pre-shredded (a great job to do while watching baseball) and the caulk remains tacky long enough to fill in the acre before it sets up.
Here's Mark planting away above MG tower.
One of the advantages of the plywood / cardboard / paper structure is that it is very easy to make changes. We already have done so in two spots on the layout. Each time it only took an hour or so.
Here's a bit of almost-finished scenery just below the curve.
Saturday, July 3, 2010
Thursday, May 13, 2010
PRR Technical and Historical Society
Like most fallen flags, the Pennsy has a historical society dedicated to preserving the heritage of this great railroad. This year's annual meeting was held in Harrisburg, PA, home of the Rockville Bridge (still carrying trains across the Susquehanna).
The meeting was an opportunity to see old friends, listen to great presentations about fascinating aspects of the railroad, admire great models, do some shopping and share ideas.
Here's a great rendition of Pennsy's four-bay H21 hopper, with the angle reinforcement along the top chord. My fleet of H21s needs this treatment for about 2/3 of the cars, an easy modification to Bowser's model. It was great to see exactly how it is done.
The Capital PenNScalers NTRAK Group set up some of their modules and ran PRR trains (plus others) all weekend. I learned the keys to successful operation of Con-Cor's nifty Aero Train: check wheel gauge carefully and add weight to each car.
Here's a neat module representing the PRR Freight Station in York, PA circa 1946.
The show offered quite a bit for the PRR modeler--what a great selection of flatcar loads to model!
If you are interested in a particular railroad, you are almost sure to find a group of modeler's with a common interest. A quick search is all it usually takes.
Tuesday, April 13, 2010
Trip to Altoona for Baseball and Rail Fanning
On April 11, John Drye, Brian Brendel, Jake Brendel and Bernard Kempinski were in Altoona to see Steven Strassberg, the $15M man pitch for the Harrisburg Senators. While they were there, they did some railfanning on the PRR Horseshoe Curve, demolished several buffets and generally had a good time. This film clip covers some of the highlights, except for Jake's lost Peanut.
Wednesday, March 17, 2010
You can't see the forest....
One thing the layout needs in large numbers (besides coal hoppers) is trees. Fortunately, N Scalers in Northern Virginia have developed a great way to represent the lush green foliage of the Alleghenies in spring and summer.
Woodland Scenics Foliage Clusters are the key. First step is to spend several evenings in front of the TV tearing the clusters into N scale treetops. Roughly-shaped spheroids (think a fuzzy green football) about 1" to 2" across are about right.
There are several means of attaching the clusters to the mountainside. I used to use hot glue but have found that clear caulk is easier to work with. It doesn't get hot or leave strings behind. Spread about a square foot's worth of caulk and attach the foam. The caulk is sufficiently tacky that the "trees" will stay on even an almost vertical surface. If not, hot glue is a backup method.
The first couple acres of forest have been planted near Horseshoe Curve. Many more are on the way.
Saturday, March 6, 2010
Scenery Progress
Over the past few weeks, we have made quite a bit of progress on preparations for actually making scenery. If you squint a bit, you can almost see what the finished layout might look like. We ought to be doing things such as detailing the roadbed, spreading ballast, and planting trees on the mountainsides in the next few months.
Getting there!
Here, a westbound (uphill) merchandise train meets a coal extra coming downhill at the curve.
A PRR I-1 shoves uphill while a set of F7s brings merchandise east.
Getting there!
Here, a westbound (uphill) merchandise train meets a coal extra coming downhill at the curve.
A PRR I-1 shoves uphill while a set of F7s brings merchandise east.
Saturday, February 27, 2010
Neither snow, nor cold....
Sunday, February 21, 2010
First Train Running
The first train on the layout was a hopper train on Track #4, with engineer Leonard White, one of the regular crew, at the controls; May 20, 2009. With some scenery installed, this view is no longer possible. It does demonstrate one of the layout design objectives: that is to have trains long enough to go completely around the curve. It takes about thirty 40-foot freight cars.
Saturday, February 20, 2010
Prototype Research
Early Benchwork
Here are a couple of shots of the early benchwork. The layout plumber and carpenter is Mark Andersen. Although he usually models in a larger scale, he managed to find some 1/160 lumber and has done a superb job of keeping the roadbed straight and level. Well, except for the curves and grades.
The first shot is the benchwork for West Altoona, from Slope to Brickyard Corner. The second is Horseshoe Curve. Both shots from early 2009.
Layout Space
Getting Started
This site is currently very much under construction. I hope to add photos and commentary on how we got to where we are currently over the next couple of weeks and then keep the site current as we complete the layout.
Thanks for participating.
John
Thanks for participating.
John
Test running the Broadway Limited
This video shows the Broadway Limited in two different scenes. In the first it passes a freight train on the westbound up hill slope. The second scene shows an eastbound Broadway Limited passing through MG Interlocking.
Subscribe to:
Posts (Atom)